Showing posts with label dyeing. Show all posts

Sunday, March 17, 2013

Right brain, left brain

I think you might say that I'm coming more into balance these days. Now that my kids have all gone away to college, my left brain is catching up to my right brain and I am spending more time on my family history research (see my other blog: Voices From A Distant Past).

But the right brain still demands its time as well, and here's what I've been up to:

I finished this scarf for my husband, using my own hand-dyed yarns.


Here's a close-up... the colors aren't quite this brown in reality:

After that, I wanted to weave an ikat pattern.  I found surprisingly few examples on the web, so I had to figure it out by myself.  First I measured the warp and dyed it chartreuse, one of my favorite colors.

Next I wrapped sections of about 20 threads in what I hoped would end up as a single organic shape, and overdyed them in cerulean blue (to get a nice chartreuse to green gradation.)

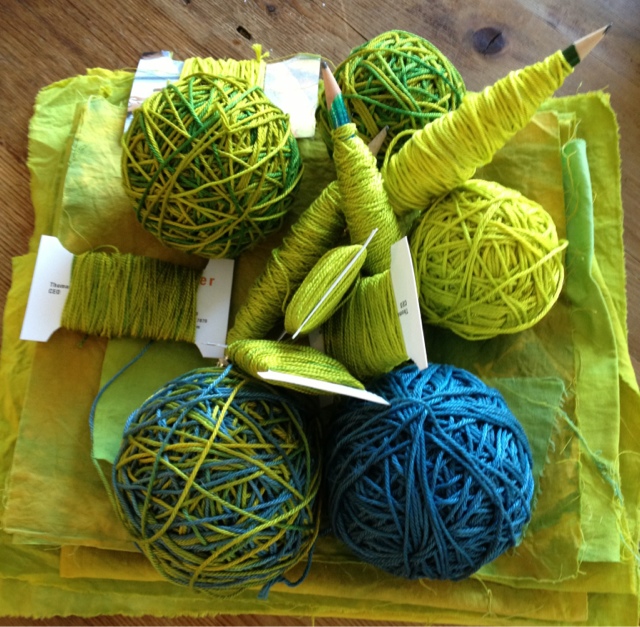
This is a selection of various weights of cotton yarns and fabrics from my dyeing session:
Here's the warp after I untied all the wraps.

And here it is, on the loom and ready to weave.

This is the finished piece.  Hmmmm. I'm not altogether pleased, but I have a better idea of what I should do next time.  I think I should use thickened dyes and paint the colors on rather than wrapping the sections of warp.  I think this would give me the organic shape I was going for.  I ended up with more of a striped effect, because each group of twenty warps had the same wrap.  If I painted the individual threads, the change from one color to the other would have been more gradual.  Oh well, live and learn!

Saturday, January 26, 2013

I've been away from blogging for awhile... life does speed up sometime.  I've had a few creative setbacks that have kept me away, too.  If you've seen my blog in the past, you'll know that my camera is happiest when it is overseas -- and 2012 was certainly a banner year for travel!  I had a chance to go to Russia this summer, but returned home only to find that one of my larger memory cards was corrupted.  I lost tons of wonderful pictures.  Right after that trip, I found out that the USPS lost a quilt I was sending out to be quilted.  I had made it for my youngest daughter to take to college, so the loss was especially hard to take -- especially because this was probably the one and only time I did not put a tracking number and insurance on a quilt I sent out!  All that heartache has made it kind of hard to pick up my camera, or set a stitch in a quilt.
Lost by USPS in July, 2012.... Let me know if you ever see it!!
While I've been daunted, I haven't given up.  Creativity just switched gears: I've been putting a lot of energy in my genealogy projects and I have been spending more time lately at Loop of the Loom, enjoying the peace and tranquility of Saori weaving:

my Saori portfolio! 
sideways detail of the first scarf I made (back in April)

I love weaving!  I am fascinated by the textures, and the possibilities for playing with color.
I'm especially interested in the interlock technique, where you hook the weft to a second color thread to get broken strands of color across the width of a piece; I've used it in every piece I've made. 

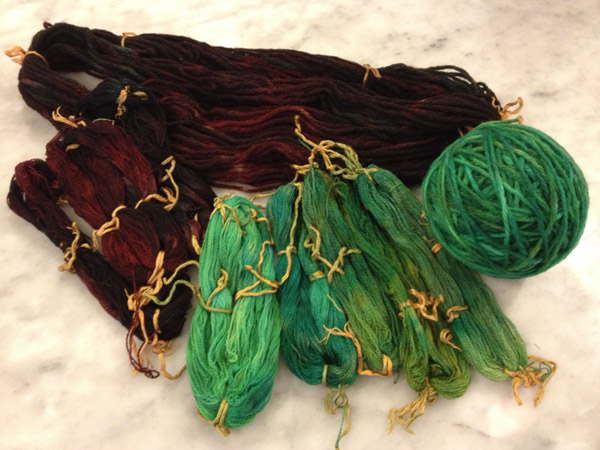
I like variegated color and couldn't find exactly what I wanted at my local yarn store, so I dyed my own wool:


Scarf in progress -- using my own hand-dyed yarns

I do tend to carry ideas out to their logical conclusion.  If hand-dyed yarn is good, then shouldn't I spin my own hand-dyed yarn?  I have some roving on hand, dyed back in 2009, and I bought an inexpensive drop spindle the other day to give it a go.  Unfortunately, spinning doesn't seem to be a popular activity where I live, so I can't find a class -- but after checking out some youtube videos, I managed to produce some yarn.  A little kinky, a little wobbly, but definitely yarn!  I need another project like I need a hole in the head, but I have to follow my curiosity or I'm not a happy camper.

And in case you were wondering, I don't think I will ever lose my love of quilting.  I had been working on this one off and on for a few years, but decided to finish it after I made my daughter's quilt (but before it was lost).  This one made it back safely through the mail, so here it is, for the record.


I've even made something new (albeit much smaller): a table runner for my quilt guild's Christmas gift exchange:


As for photography..... yes, I've had lots of opportunities to take more shots after losing so many this summer.  But.....now I'm learning Lightroom, too.  It isn't huge learning curve, but I have lots of work to catalog everything, so it might be awhile before I start sharing again!

Tuesday, September 13, 2011

Doing some dyeing!

My kitchen has been turned into an art studio this week: my daughter has claimed the breakfast table for her paintings, and I have taken over the counter, sink, and work table for fabric dyeing.

I cleaned everything up this afternoon, just in time to take a few photos before it got dark, so I can link up to Texture Tuesday over at Kim Klassen's cafe.  The theme this week is "Do...."  Well, I've been doing lots this week... but not photography! Click here to check out the gorgeous images submitted by thoughtful artists who take their craft seriously -- my photos were taken almost as an afterthought; still, I think you can see I am in a colorful mood!

Kim Klassen's "Scripted Autumn" (overlay @100%), my "medium copper" (lighter color  @70%),

"Scripted Autumn" (soft light @100%), my "medium copper," (inverted, soft light @100%)

"Scripted Autumn" (overlay @100%), my "light copper" (inverted, soft light @50%)
Sometimes I just want to make colors, and that's why I love to dye -- I really enjoy the mad scientist aspect of mixing the dyes and playing with chemicals.  But most of all, I am thrilled by the mystery of how it will all turn out.  I like to do low-immersion dyeing; the patterning of the colors on the fabric (and even the colors themselves) comes out differently every time since I don't follow exact recipes.

(I generally leave the fabrics in the dye anywhere from 4 to 24 hours.  I am not overly fussy about the batching time.)

This time I also dyed yarns, threads, cheesecloth, throwsters waste, and silk carrier rods.  They all took the dye beautifully!


I like to use the spent dye to stain tissue paper or paper towels for use in collage.  The dye that has already been used to dye fibers still has enough umph to color the papers and since I hate to let anything go to waste, I embarked on a major paper staining sub-project.  You can see in this photo how you quickly run through stacks and stacks of tissue paper; for some reason I ended up with miles of green paper.....

One thing leads to another, and since I had all the equipment out, I wanted to try batiking using dyes instead of paint.  (I had previously taken a workshop on soy wax batik with Melanie Testa using fabric paint.)  The soy wax stood up pretty well to all the rinsing you have to do to get rid of excess dye.  The beauty of soy is that it is safe for household plumbing -- a good thing since much of it washed out in warm water.  The photo doesn't do justice to these pieces.... they turned out very well:


As if all this wasn't enough, I've been reading Jane Davies' new book, and thought I'd try out the tyvek technique she mentions in it.  You basically just iron some tyvek between sheets of newspaper (you can use an express mail envelope from the post office).  After a few passes with the iron, it will begin to shrivel and distort.  Being careful not to melt it too much, you can get some interesting weathered effects.  Here, I've taken shriveled tyvek pieces and painted them with metallic paints.


British artists such as Maggie Grey and Jean Littlejohn and Jan Beaney use these in their free-form embroideries, but I think they would also work well in collage. Here, I've used a piece as a decoration for a box I made:
Sometimes I think that I enjoy making the elements of art -- the decorated papers, the painted and decorated surfaces, the dyed fabrics -- even more than the finished artwork.  I love color and texture for its own sake.  What's your favorite part of the process?

Saturday, March 19, 2011

dyed in the wool -- or, what does chaos theory have to do with chess?

I recently read a series of books by Connie Willis about time-traveling Oxford historians in 2060 who go back to the London Blitz, only to find themselves stuck in time.  They were great fun to read, and I liked them so much I even turned around and read the last one again as soon as I finished it.  Willis is a big fan of chaos theory (I found a terrific explanation of the concept here), and she wrote about an intricate web of random minor events with great big huge implications.  My take on this is that the seemingly unrelated events in our lives are imbued with meaning, and that we live in a vast network of interconnections.  The journal page I posted yesterday was inspired by the convergence of several such interconnected strands.....Traci Bunkers, Polka Dot, Carolyn Myss, the US Navy.... we live in a chaotic system, where you never know how you are linked to everyone else.  Just know that you are!  

Last night I decided to dye some wool.  I don't use a lot at a time for embroidery work, but I do love to use beautiful textures.  Buying full skeins of all the colors just isn't cost effective for me, so why not buy one skein of gorgeous fiber, separate it into smaller bits and dye them?  This is half alpaca, half silk, and has a sheen that doesn't show up in the photos.  The dyes are the ones I bought when I visited Peru two years ago (see these posts).  I'm traveling next week and I want a project for the road, so now I have some supplies.

peruvian dyes on alpaca/silk
Dyed in the wool = someone who is unwavering in their principles.  Getting back to Carolyn Myss, she writes that living an honorable life comes at a cost.  You must be willing to stand up for what is right, regardless of how it affects your comforts.  Disasters -- such as Japan's nuclear crisis, or the ruined levies in Hurricane Katrina, for that matter -- take place because corporations (or politicians) are willing to accept even catastrophic future risks rather than impact their bottom line today.  Carolyn's piece urges a sea change in that line of thinking.

And by the way, none of this has anything to do with chess (at least for now).

Monday, February 7, 2011

if it's not one thing, it's another....

I now know why it was so hard for me to keep a blog in the past.  I simply can't be one of those wonderful artists who can write about their creative process every single day.  "Life" always seems to creep in there for me.  It's not that I don't get anything done, either.  I do, but because I have so many projects going simultaneously, and because I work on them in 10 minute increments in between other things, it seems as though everything in my world just takes a very long time.

I did get a few things done over the last few days:  Here's a needle felted sewing kit (the applique is RIT-dyed batting).
I finished this image of the madonna and child.  It was fun to do -- I printed a photo I took of a medieval painting (from the Loreto Museum in Prague) onto a piece of interfacing, and used the printed image to guide the sewing machine needle as I free-style machine embroidered it.

Finally, I have been trying to finish the quilt I am hand quilting.  This has been a long project... some three years so far, and I can finally see the light at the end of the tunnel.  Here's the second-to-last block:
I have to say, I do love my own creative process, even if it does take a long time.... Or maybe it's because it takes a long time?

Thursday, July 30, 2009

RIT dyed batting project finished! (well, sort of....)

Life has gone on hyper-drive until just this last week or so, what with graduations, visitors, college visits, etc., so it has taken me awhile to get around to posting this. I finally finished my project using the RIT dyed batting. I have this constant swirling image running through my head, which I have made before using commercial fabrics -- but this is the first time I've created it using my own colors. I had a lot of fun grading the colors from light to dark, and in a few places I used some of my dyed wool roving for shading. The whole thing was needlefelted onto another piece of dyed batting, and that's where the problem lies. Because it is batting, it ripples along the edges, and if I quilt it, I'll have to work very hard to ease in all the fullness. I am half inclined just to staple it taut onto a picture frame and be done with it.

Thursday, May 28, 2009


More on RIT-dyed batting

I ran out of batting scraps, believe it or not, and then remembered I had some in the attic.  It was the real cheap stuff, from Jo-Ann's, that I bought back when I first started quilting and didn't know any better.  The photo doesn't do it justice, but actually I love how it turned out.  It looks very nubbly and worn, like something from the bottom of the sea.  Plus, the colors are brilliant.  Really, I wish you could see it in person, because it just isn't the same in the photos.


Monday, May 25, 2009


Dyeing Batting using RIT dyes

After reading Judy Coates Perez's article in Quilting Arts Magazine (Dec/Jan 2009), I decided to try dyeing batting with RIT dyes.  Like most quilters, I have scads of batting scraps lying around. What really got my attention, though, was the potential of using batting for needle felting.  My expectations were low, having used RIT dyes once before to dye a costume for one of my kids (no photos of THAT disaster, lol).... but I was pleasantly surprised at the depth of color I got using the low water immersion technique Judy outlined in her article. 

One caveat:  Given that one package of powder only dyes about 1/2 yard of batting, this is probably not the most cost efficient way to dye -- although it is certainly easy and fast.  I tried to dye some fusible interfacing, too, but the kind I had on hand must have had too much polyester content and not enough nylon, because it came out very pale and boring.  

I am in the process of making a really cool project, and will post pictures when I am a bit further along.  This is so much fun!


Sunday, May 24, 2009

Follow-up on Peruvian Dyes for wool roving


Here is where I bought the dyes I used today -- at the market in Urubamba, Peru.  I only wish I had gotten more, because they work beautifully.  I am so happy with the results.

The only strange thing is that my fingernails now look like they have green polish!  I used gloves, of course, and my fingers themselves show no discoloration, but my nails have gone from a pale pink polish to green.  There weren't any holes in the gloves, either.  Weird.


Dying wool roving with Peruvian dyes


Dying wool roving was something I've wanted to try, since I just got a new needle felting machine for Mothers Day. I visited Peru last Christmas and bought some dyes in a market, and thought this would be a great time to experiment with them.

It was so easy! Here's what I did:
  • I used a pound of merino wool that I ordered online from Alpaca Direct, and cut it into 1 oz. lengths (somehow, I must have gotten the measurements a little wrong, since I ended up with 18 "1 oz." sections from a 16 oz. ball of wool.....).
  • For the mordant, I soaked the wool in a 10% alum solution. A small jar of alum from the grocery store was 1.9 oz..... close enough to the weight of the wool that I was dying, so I emptied the jar into a bucket of warm water and soaked my 1 oz. bundles for an hour.
  • For each 1 oz. bundle, I put 2/32 of a tsp. dye into a jar, and then added 1/2 c. warm water and a scant 1/4 c. white vinegar, plus the wool. I stirred it around with a chopstick, then placed 6 jars at a time into a baking tin filled about half way with water (like a bain marie), and put it into a 275 degree oven for 45 minutes.